Assembly Hole
| The Assembly Hole command lets you create holes going thru different parts. You could actually create holes for each part in the Part Design workbench, but the Assembly Hole command available in Assembly Design workbench creates holes more rapidly and more productively: the command creates a hole going thru several parts in only one interaction. | ||||||||||||||||||||||
| You can now create distinct shapes of holes going thru the individual parts of an assembly and this, in one shot. To know how to do this, please refer to Using Hole Series. | ||||||||||||||||||||||
| This task shows you how to create a hole on a product including three parts, but you will create the hole on two parts only. | ||||||||||||||||||||||
| Open the AssemblyHole.CATProduct document. | ||||||||||||||||||||||
| 1. | Click the Hole icon |
|||||||||||||||||||||
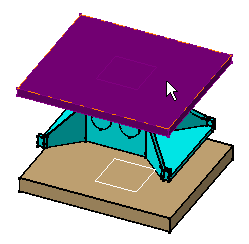
| 2. | Select the purple face as shown to define the location of the hole: | |||||||||||||||||||||
|
|
||||||||||||||||||||||
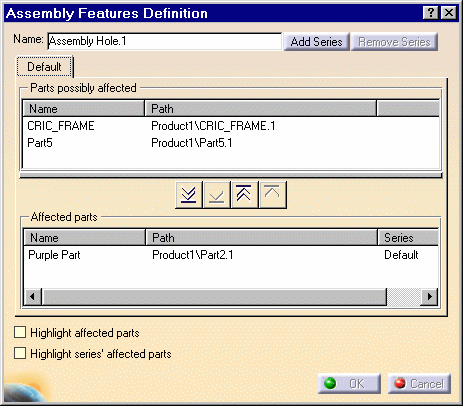
| The dialog box that appears displays the names as well as the paths of the parts that may be affected by the hole creation. | ||||||||||||||||||||||
| The assembly feature's name now appears in the top left corner of the dialog box. If desired, you can edit this name. | ||||||||||||||||||||||
| The frame 'Affected parts' is exclusively reserved for the parts you wish to use. Purple Part is displayed in this frame. | ||||||||||||||||||||||
|
|
||||||||||||||||||||||
|
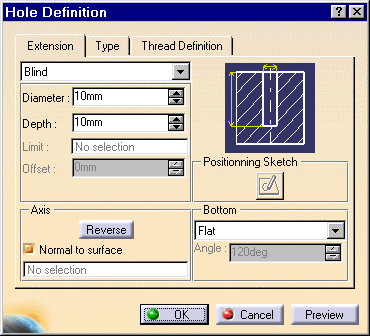
Note that now the Hole Definition dialog box is displayed. |
||||||||||||||||||||||
| 3. | As you wish to create a hole between Part5 and Purple Part, move Part5 to the list 'Affected parts". The other three buttons lets you move the names of the parts from one list to another too:
|
|||||||||||||||||||||
| 4. | Check the option Highlight affected parts to clearly identify the parts. | |||||||||||||||||||||
| At this point, you can now define the hole you wish. | ||||||||||||||||||||||
|
|
||||||||||||||||||||||
| Whatever hole you choose, you need to specify the limit you want. If you do not specify a depth value, four types of limits are available: | ||||||||||||||||||||||
|
||||||||||||||||||||||
| 5. | Set the Up to Last option. The application will extend the hole from the sketch plane to the last face encountered. | |||||||||||||||||||||
| 6. | Enter 25mm as the diameter value. | |||||||||||||||||||||
| By default, the application creates the hole normal to the sketch face. But you can also define a creation direction not normal to the face by unchecking the Normal to surface option and selecting an edge or a line. | ||||||||||||||||||||||
| If you are designing a blind hole, you can set the Bottom option to V-Bottom to create a pointed hole and then enter the angle value of your choice. | ||||||||||||||||||||||
| Clicking the Type tab lets you create the following holes: | ||||||||||||||||||||||
|
||||||||||||||||||||||
| Make sure the option Simple is set.
Clicking the Thread Definition tab lets you access to the options defining threads. For more information about threads and holes, please refer to Part Design User's Guide. |
||||||||||||||||||||||
| 7. | Click
OK to confirm.
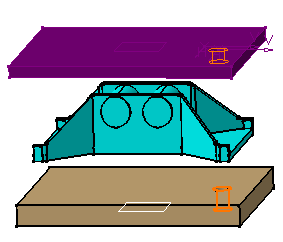
The hole is created on Part 5 and Purple Part. Conversely, CRIC_FRAME is intact. |
|||||||||||||||||||||
|
|
||||||||||||||||||||||
| A new entity 'Assembly features' appears in the
specification tree. It contains the assembly hole referred to as
'Assembly Hole.1" and the affected parts.
Moreover, this feature has generated a hole in each part. An arrow
symbol identifies these holes |
||||||||||||||||||||||
Editing an Assembly Hole |
||||||||||||||||||||||
To edit an assembly hole, double-click
'Assembly Hole.X' entity then you can either:
If you need to cut the link between a generated hole and Assembly Hole.1, just use the Isolate contextual command. You will then obtain a 'traditional' hole as if you had designed it in Part Design and you will be able to edit it in Part Design. |
||||||||||||||||||||||
Reusing Part Design Holes |
||||||||||||||||||||||
| To increase your productivity, you can create Assembly holes from existing Part Design holes, or more precisely by reusing the specifications you entered for designing Part Design holes. To do so, just proceed as follows: | ||||||||||||||||||||||
| 1. | Click the Hole icon |
|||||||||||||||||||||
| 2. | Select the Part Design hole of interest. | |||||||||||||||||||||
| 3. | Both the Hole Definition and the
Assembly Features Definition dialog boxes display. You then just need to
specify the parts to pierce.
The assembly hole inherits the specifications as displayed in the Part Design Hole Definition dialog box. You can edit these specifications at any time. Editing an Assembly feature created in this way does not affect the specifications used for the Part Design feature. |
|||||||||||||||||||||
Reusing Assembly Design Holes |
||||||||||||||||||||||
| The application also lets you reuse Assembly Holes' specifications to accelerate the design process. In this case, you just need to select the existing assembly hole, click the Assembly hole icon and then select a face. Only the Assembly Features Definition dialog box appears to let you determine the parts to pierce. | ||||||||||||||||||||||


