Setting Relations Between Dimensional Constraints
| This task shows you how to set constraints between dimension using formulas. As a result, if you modify one of these dimensions (the driving dimension), all the other dimensions as well as the geometry will be modified accordingly. | |
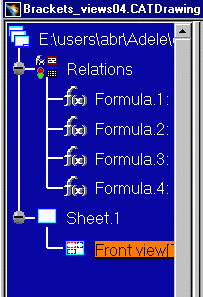
| Open the Brackets_views04.CATDrawing document. | |
| 1. Click the
Formula icon
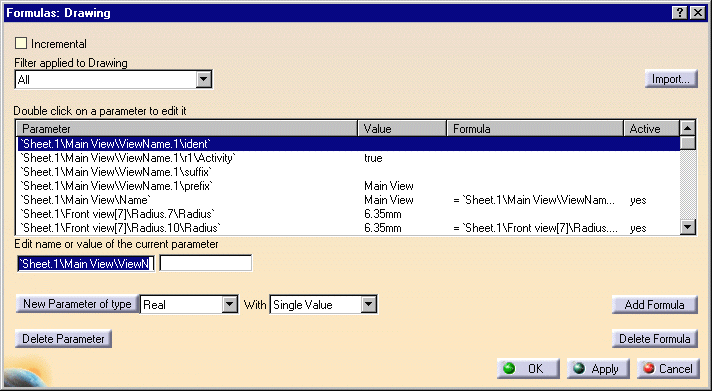
The Formulas dialog box appears.
You will now select, one after the other, the dimensions to be constrained and then enter in the dialog box the formulas to be used. |
|
|
|
|
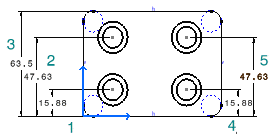
| 2. Select
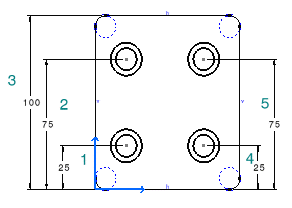
a first dimension (1).
3. Press the Add Formula switch in the Formulas dialog box. The Formula Editor dialog box appears.
|
|
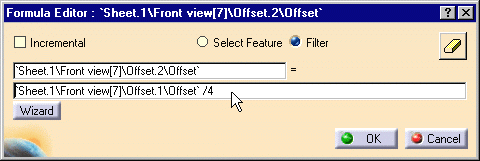
4. Select a second dimension (3) and add "/4". Then, click OK (Formula Editor dialog box). 5. Select a first dimension (2).
|
|
|
6. Press the Add Formula switch in the Formulas dialog box. The Formula Editor dialog box appears.
|
|
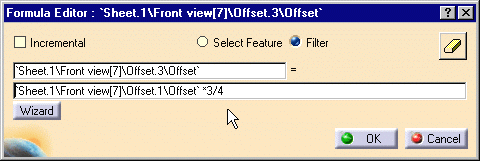
| 7. Select
a second dimension (3) and add "*3 /4". Then, click
OK
(Formula Editor dialog box).
|
|
| 8. Select
a first dimension (4).
9. Press the Add Formula switch in the Formulas dialog box. The Formula Editor dialog box appears.
|
|
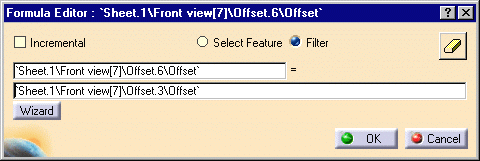
| 10. Select
a second dimension (1) and
then, click OK (Formula Editor dialog box).
|
|
| 11. Select
a first dimension (5).
12. Press the Add Formula switch in the Formulas dialog box. The Formula Editor dialog box appears.
|
|
| 13. Select
a second dimension (2) and
then, click OK
(Formula Editor dialog box). 14. Click OK ( Formulas dialog box). |


| Note that the specification tree is modified accordingly.
|
|
| 15. Double-click
the dimension to be set as driving dimension (3).
The Dimension Value dialog box appear.
|
|
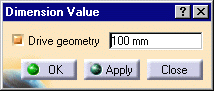
| 16. If needed,
activate the Drive geometry option.
17. Enter 100mm as dimension new length and press OK. All the dimensions which you previously constrained using formulas are automatically updated.
|
|
|
|
|