Before You Begin
Setting Text Properties |
||
| This task explains how to set the properties of a text, such as font style, size, justification, etc. Text properties can be applied to text, dimension text, text with leader, balloon and datum target, as well as to text included in datum features and geometrical tolerances. You can set the properties of a text either before or after creating it. | ||
| Create a text. | ||
| 1. Choose View
-> Toolbars, and select Text
Properties. |
||
 |
||
| 2. Select the text. |  |
|
| 3. Choose the properties you want to apply to this text from the Text Properties toolbar. For instance, select Italic and Bold. The properties you chose are applied to the selected text. |  |
|
The options available in the Text properties toolbar are listed in the table below:
Option |
Name |
Description | ||||||
|---|---|---|---|---|---|---|---|---|
| Font Name | Changes the style of the text. | |||||||
| Font Size | Changes the size of the text. | |||||||
|
Bold | Changes the weight of the text. Toggles between normal and heavy (bold). | ||||||
| Italic | Changes the angle of the text. Toggles between normal and slanted (italic) | |||||||
| Underline | Adds a line under the text. | |||||||
| Strike Thru | Adds a line through the center of the text. | |||||||
| Overline | Adds a line above the text. | |||||||
| Superscript | Raises the text above the normal text line. | |||||||
| Subscript | Lowers the text below the normal text line. | |||||||
| Left Justify | Aligns multiple lines of text to the left edge of the text frame. | |||||||
| Center Justify | Centers multiple lines of text within the text frame. | |||||||
| Right Justify | Aligns multiple lines of text to the right edge of the text frame. | |||||||
| Anchor point | Changes the position of the point that connects the text to
the drawing or to an element. Choices are as follows:
|
|||||||
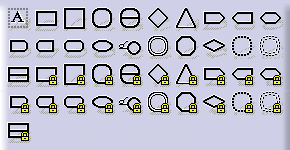
| Frame | Draws a single-line frame around the text. A variety of different shapes is available. You can choose to create each frame with either a variable or a fixed size. For
a rectangular frame, for example, the icon |
|||||||
Using Default Values |
|||||||
| Create a text and set its properties as explained above. | |||||||
| 1.
Right-click the text and select Set as default to specify that
you want to use the properties of this text as user defaults. 2.
Choose View
-> Toolbars, and select Style. 3. From the Style toolbar, select
Only User Default Properties to specify that you only want to
use the properties that you set as defaults. The Text Properties toolbar options are then grayed out, meaning that they are no longer available. From now on, any annotation you create will be assigned the user default properties. |
|||||||
 |
|||||||
|
|||||||
Specifying the Position and Orientation of a TextYou can specify the position (x, y) and/ or orientation (angle) of a text. |
|||||||
| Create a text. | |||||||
| 1. Choose View
-> Toolbars, and select the Position and Orientation command.
The Position and Orientation toolbar is displayed.
|
|||||||
2. Select the text for which you want to specify the position and/or orientation. 3. Enter the required values in the Position and Orientation toolbar.
|
|||||||
|
|||||||


