Advanced Reporting
 |
An Advanced Report is an extract summary of an objects set computation results and status messages,
captured in an editable file.
Once an objects set has been computed (meaning that the user-defined
specs have been converted into solver commands, which in turn have been
transformed into degree o freedom data and processed), all the data contained in the object is ready
for use in the subsequent finite element computation process and the
object can be analyzed.
 This capability is only available if you installed the ELFINI Structural Analysis product.
|
 |
This task shows how to extract the desired data and generate a
Report for Computed Solutions.
|
 |
You can use the sample02_Image_Loads.CATAnalysis document.
Before You Begin:
Compute the solution: for this, click the Compute icon  .
In this particular case, an error message appears on singularity. Click OK
in the Error Message dialog box and go on with the scenario. .
In this particular case, an error message appears on singularity. Click OK
in the Error Message dialog box and go on with the scenario.
|

|
1. Click the Advanced Reporting icon
 . .
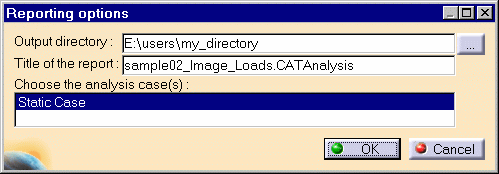
The Reporting Options dialog box is displayed.

2. Set the path, choose one or more
analysis cases, if needed, and click OK to close the
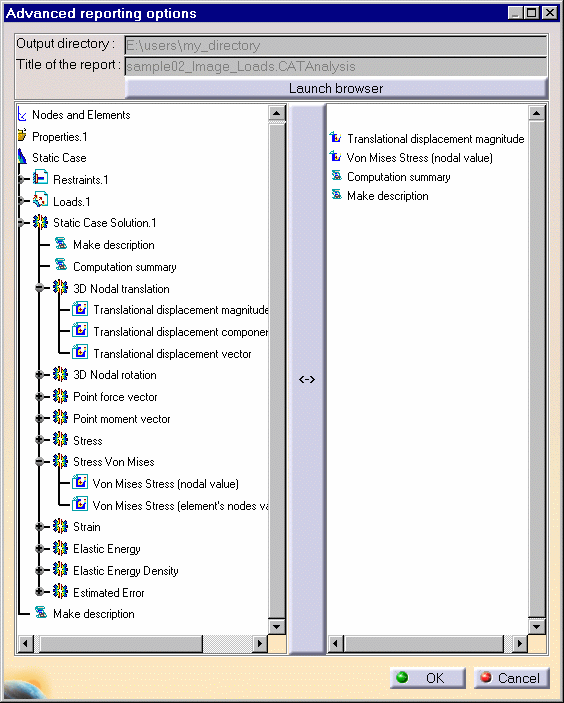
dialog box. The Advanced reporting options dialog box appears and lets you
define which information you wish to extract from all the specifications before launching the browser,
creating and if needed updating the output Report file.
There are two windows in the Advanced reporting options dialog box. The
left window displays the data corresponding to the specification tree. The
right window displays the data which you want to appear in the advanced
report:
 | Left window: data is grouped according to the physical types. If, in
the left window, you double-click a data or select a data and then
click the arrows at the middle of the dialog box, you will make this data
appear into the right window. This data will be extracted and appear
in the advanced report when you will launch the browser. |
 | Whatever the order in which you will select the data from the left
window into the right window, this data will be displayed in the right
window in the same order as it appears in the
specification tree. |
 | At any time, you can double-click data in the right window so that
it appears no more in this right window and is therefore suppressed from the advanced report. |

3. Click the Launch browser
button in the Advanced
Reporting Options dialog box and in
the left window, double-click a data or select a data and then
click the arrows at the middle of the dialog box to make this data
appear into the right window.
4. Click OK in the Advanced
Reporting Options dialog box.
The data displayed in the right window is now extracted and appears
in the advanced report generated into a HTML file.
 | The HTML file containing the Report of the Static Case Solution objects set
computation contains information relative to the computation procedure: |
- restraints translation
- loads translation
- numbering
- SPC singularity auto-fixing
- constraints factorization
- stiffness computation
- constrained stiffness and loads computation
- stiffness factorization
- displacement computation
- reactions computation
- equilibrium checking
 | Every time you perform a modification in the Advanced reporting
options dialog box, you can use the Refresh button to have the report
automatically updated. |
 | The illustrations you get in the report correspond to the viewpoint
you define as you generate the report. This is very useful if you wish
to zoom in given parts. |
 | Make description data corresponds to detailed descriptions.
Computation summary corresponds to non-detailed descriptions. |
 | For Frequency cases and Buckling cases, when visualizing images
(Image Editor dialog box) Mode1 is the mode used by default. If you
want to add modes, right-click on an image, select the Select
occurence(s) option from the displayed contextual menu and
multi-select the desired modes from the dialog box that appears. Of
course, if you perform a refresh in the Report HTML file, the modes
will be added. |
|
 |
In addition to the HTML Report file, the program also
generates a Text file ready for user editing.
5. Click here to open the .txt file:
sample02_Image_Loads_Adv.txt.
|
|

|
|

