 |
This task explains how and when you should update your
design. The point of updating your design is to make the
application take your last operation into account. Indeed some changes to geometry or a
constraint may require rebuilding the part. To warn you that an update is needed, CATIA
displays the update symbol next to the part name and displays the corresponding geometry
in bright red. |
|
To update a part, the
application provides two update modes:
 | automatic update,
available in Tools -> Options -> Shape, General
tab. If checked, this option lets the application update the part when
needed. |
| manual update, available in Tools -> Options -> Shape,
General tab, it lets you control the
updates of your part. You simply need to click the Update icon  whenever you wish to integrate modifications.
 |
|
 |
-
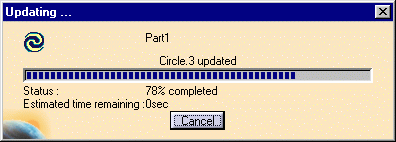
To update the part, click the Update icon .
A progression bar indicates the evolution of the operation.
|
|
|
|
You can cancel the
undergoing update by clicking the Cancel button available in the
Updating... dialog box. |
 |
| Keep in mind that some operations such as confirming the
creation of features (clicking OK) do not require you to use the update
command. By default, the application automatically updates the operation. |
|
|
| The Update capability is also available via Edit -> Update
and the Update contextual command. |
|
|
|
To update the feature of your
choice, just select that feature and use the Local Update contextual command. |
|
|
| Besides the update modes, you can also choose to visualize
the update on the geometry as it is happening by checking the Activate
Local Visualization option from the Tools -> Options -> Shape,
General tab.
In this case, as soon as you have clicked the Update icon :
- the geometry disappears
from the screen
- each element is displayed
as it is updated, including elements in No Show mode. Once they
have been updated, they remain in No Show mode.
|
|
|
Interrupting Updates
|
| |
This task explains how
to update a part and interrupt the update operation on a given feature by
means of a useful message you previously defined. |
 |
Open any document
containing geometric elements. |
| |
-
Right-click an element from the specification tree and
choose the Properties contextual menu item.
The Properties dialog box is displayed.
|
|
-
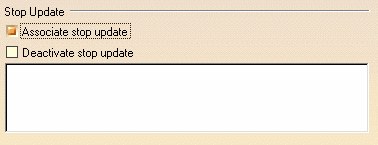
From the Mechanical tab, check the Associate
stop update option.
|
|
-
Enter the text to be displayed when the updating
process will stop when reaching this element.
-
Click OK to confirm and close the dialog box.
|
|
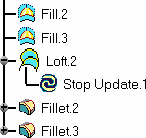
The Stop Update.1 feature is displayed in the specification tree,
below the element for which it was defined.
|
 |
|
-
Whenever it is needed, click the Update icon
to update the whole part.
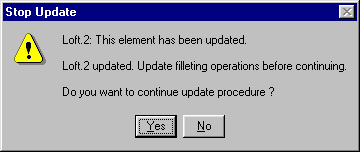
The updating process stops after having updated the
element selected above, and issues the message as has been defined
earlier:
|
|
|
|
-
Click Yes or No, depending on what you intend to do
with the geometry created based on the selected element.
|
| |
Would you no longer need this capability, you can:
| right-click the element for
which the stop was defined, choose the Properties
contextual command and check the Deactivate stop update
option from the Mechanical tab:
the update will no longer at this element.
You notice that when the capability is deactivated, the Stop Update
icon changes to: in the specification tree.
 |
| right-click Stop
Update.1 from the specification tree, and choose the Delete
contextual command. |
|

|