Chapter 5 Using the Visual Basic Editor
5.1 Adding the Visual Basic Editor to the ribbon
Before we can start writing any VBA code, we need to learn how to access the Visual Basic Editor. By default this is hidden from view, so in this section we will explain how to add the Editor to the ribbon.
Choose the File tab on the ribbon, and click on the
Options icon near the bottom of the left-hand
column. This will bring up a new window containing many configurable
settings. You may wish to change a variety of these options, but for
now the Customize Ribbon section in the main menu. The
window will now be as in Figure 5.1. Check the box next to
Developer in the right-hand menu (and then click
OK at the bottom) to add the Developer tab to the Ribbon.
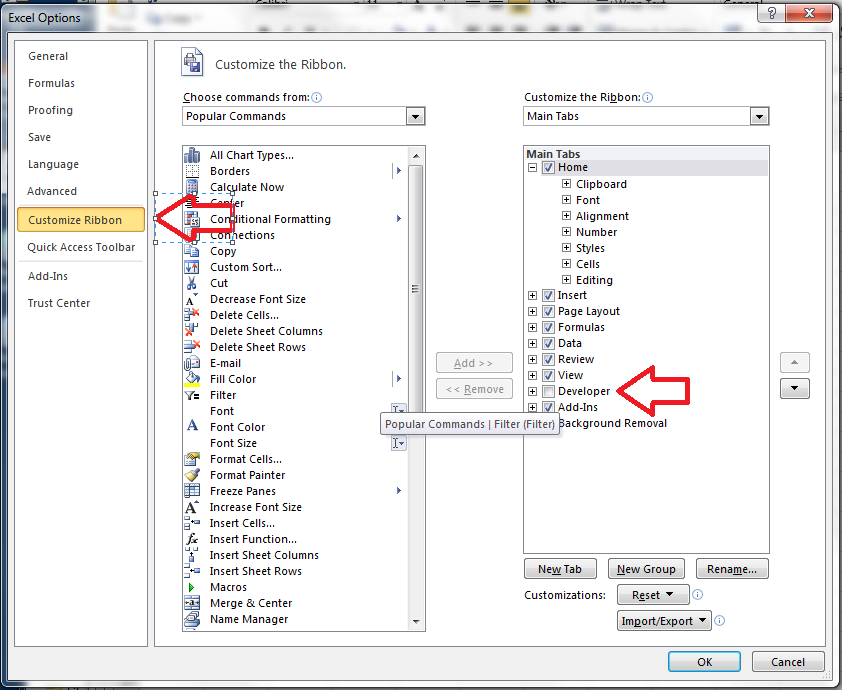
Figure 5.1: Customising the Ribbon
Now that you have done this there will be an extra Developer tab in
the main Ribbon; choosing this will display the options shown in
Figure 5.2. In the Code section of this tab can
be found the Visual Basic icon which opens the Visual
Basic Editor.

Figure 5.2: The Developer tab
Once the editor has been added to the ribbon, you can (if you
wish) access it even more quickly in future by right clicking on the
Visual Basic icon and selecting Add to Quick Access Toolbar. This will add a new icon to the quick access
toolbar as shown in Figure 5.3. There is one further way to
access the editor without using menus, via the keyboard shortcut
Alt+F11.

Figure 5.3: The quick access toolbar with the Visual Basic Editor added
5.2 The basic layout of the Visual Basic Editor
Once open, the Visual Editor will display some of the various windows
illustrated in Figure 5.4. Some of these may be missing when the
editor is first opened; for now the most important of the windows is
the Module Window, as this is the place where we will
write our functions.
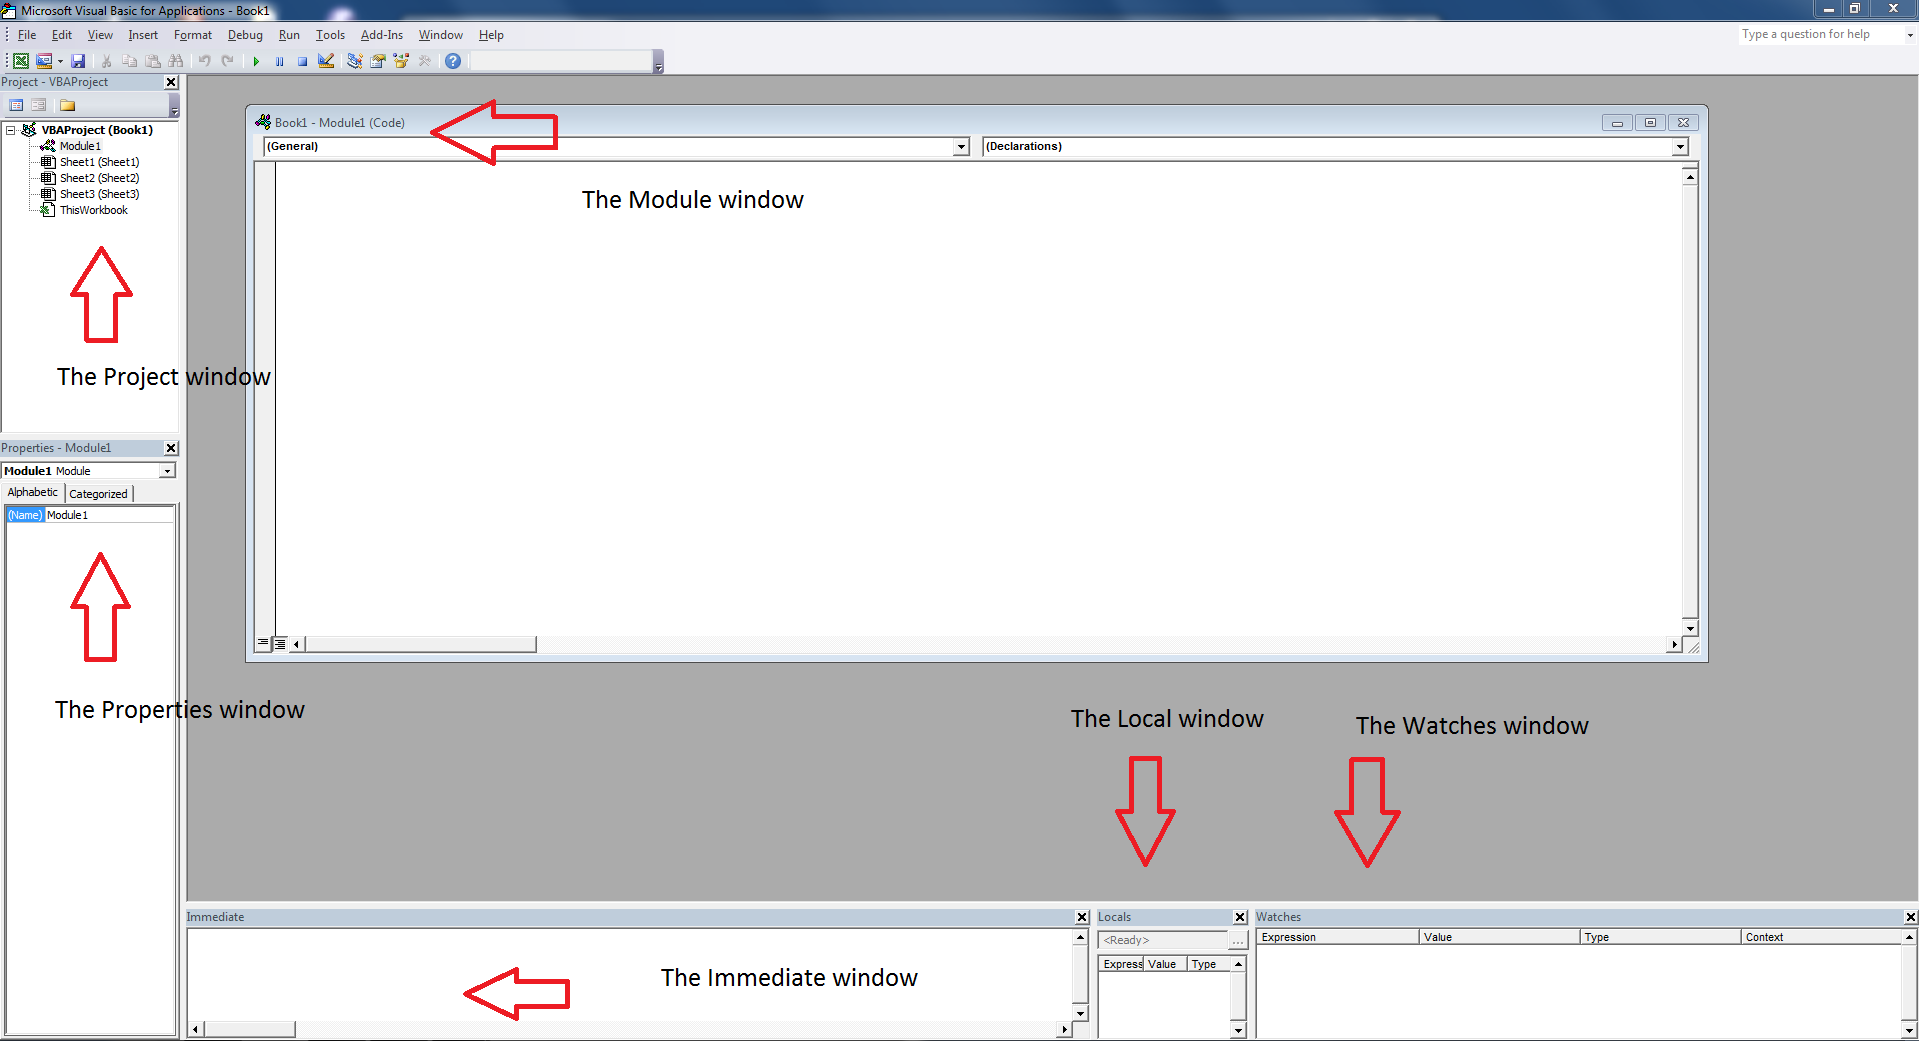
Figure 5.4: The Visual Basic Editor
If the module window is not displayed, then use the Insert and Module option to create a new module. The Immediate window displays useful
messages when running code
(for example, error messages).
The other windows
are less important at this stage and can for now be ignored. The
Localand Watches windows are useful when writing
and debugging more complicated
programs, and for now may be safely closed if desired. To close (or
open) any of these three windows, use the View menu.
The Project window displays the
structure of the
workbooks and worksheets currently in use. The Properties
window displays (as the name suggests) the properties of the
object under consideration. Again, these will not be a great
concern to us while we concentrate on basic programming. They do play an
important role when we want to work with more complicated structures.
You can return to Excel from the editor by clicking on the Excel icon
in the top left-hand corner, or by pressing Alt+F11.
5.3 Entering code into the editor
When entering code it is very important to ensure that you are working in the module window. In this window the editor will try to help you with your code by adding various statements and prompting you when you make an error. For example, suppose you want to enter the function shown below
Function test(x, y, n)
test = 0
For i = 1 To n
    test = test + (x-i) ^ y
Next i
End Function
Suppose that you start by typing Function into the module
window but accidentally press Return. Then the editor will recognise
that you have not given a valid function syntax and display an error
message as in Figure 5.5, while highlighting the actual error
in red.
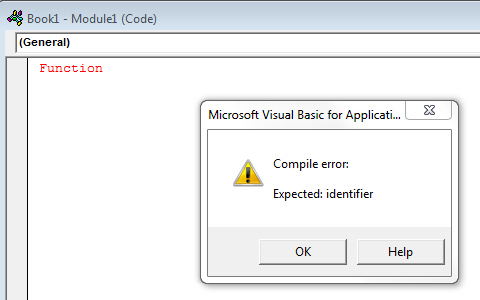
Figure 5.5: A basic error in entering a function
As well as detecting errors such as this, the editor will also help
you save time by entering extra text to complete what you are trying
to do. Going back to our example, suppose that you enter
Function test and then press Return. The editor recognises that
you wish to create a new function called test, and adds in a pair of
brackets (where you can add any arguments that may be required) and
also adds an End Function at the bottom, as in Figure
5.6.
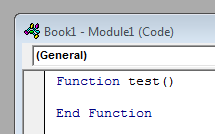
Figure 5.6: An example of the editor completing what is typed
The code for the function can now be entered into the space between the start and end of the function. Also notice that the editor highlights certain features of the function construction in blue. This is to help you read the code more easily.
It is important to write code in a way that is easy to read — both
so that other people can understand it and so that it is easy for you
to debug or modify. In this example we have indented the code between
the For and Next lines as this part forms a
loop in our code. Good programming style will be discussed later in
this module. For now, note that indentation of this form is best done
using the Tab key, as it automatically indents by an
appropriate amount, and the following line then remain indented until
Backspace is used to return to the previous level of
indentation.
Once we have written a function, it can be used in that Excel workbook in exactly the same way as a standard Excel function. Going back to the Excel sheet (by clicking on the Excel icon) we can now type =test(3,2,2) into a cell in the spreadsheet, and the number 5 will be displayed, as \[5=(3-1)^2+(3-2)^2.\] As with any inbuilt function, as we start to type the function name Excel will prompt us with the name of the function (in this case test).
5.4 Dealing with errors
No matter how carefully we try to write our code, it is inevitable that errors will occasionally occur. Some errors are more easily dealt with than others. For example, suppose that we write a function which involves dividing by some number \(x\). If \(x\) is zero when we run the function, then Excel will display an error message just as it does for built-in functions. Of course, it would be better to design our code so that it can deal with these errors itself, but the standard Excel errors messages are often good enough.
Suppose now that we write the following simple function:
Function doubleroot(x)
doubleroot = 2 * Sqr
End Function
This uses the function Sqr, which is the VBA
version of the square root function. (Note that this is different from
the square root funtion in Excel!) However, in the example, there is a
missing (x) after the Sqr function.
VBA will allow this to be entered without indicating an error. However, when the function is used in Excel, the application will jump to the editor, and display the message shown in Figure 5.7. Notice that the error is highlighted in blue.
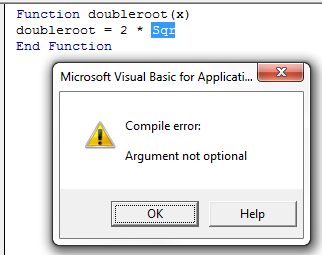
Figure 5.7: The effect of calling the function doubleroot
Pressing OK will bring up the editor so that the function
can be edited. The function will now appear with a yellow highlight,
as shown in Figure 5.8. In order to remove the yellow
highlight and correct the error, the stop button (indicated by a red
arrow in the Figure) should be pressed. The function then stops
running and can be edited.
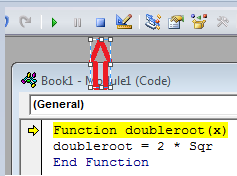
Figure 5.8: Correcting the error in doubleroot
If the screen is part highlighted in yellow, and particularly if VBA will not allow you to continue editing or running functions, use this stop button to return to the editing mode.
Sometimes Excel will run a given function for a very long time, or
even get trapped in an endless loop. To try to break out of a long
calculation using a function in Excel, the Esc key is
usually sufficient. In extreme cases the whole of Excel may cease to
respond, and the Escape key will no longer be enough.
If absolutely
necessary, you may need to abort the whole of Excel by pressing
Ctrl+Alt+Delete, and then bring up the Task Manager to kill the
Excel process. However, doing this will cause any recent work you have
done to be lost.