Adding Bodies
| This task illustrates how to add a body to another body. Adding a body to another one means uniting them. | |||||||
| When working in a CATProduct document, it is no longer necessary to copy and paste the bodies belonging to distinct parts before associating them. You can directly associate these bodies using the same steps as described in this task. | |||||||
| Open the Add.CATPart document and make sure Part Body is the current body. | |||||||
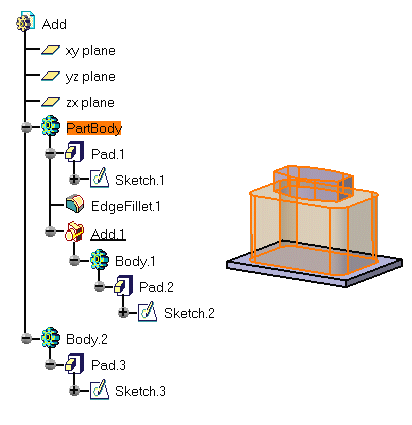
| This is your initial data: the Add part is composed of three bodies. Each body includes a pad. These pads are therefore independent. | |||||||
| 1. | To add Body.1 to Part Body, select Body.1. | ||||||
|
Adding a set of bodies (multi-selected via the Ctrl key) is possible. This capability will increase your productivity. |
|||||||
 |
 |
||||||
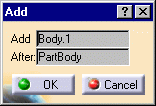
| 2. | Click the Add icon |
||||||
The Add dialog box that appears displays the name of the selected body and the Part Body. By default, the application proposes to add the selected body to Part Body. For the purpose of our scenario, we keep this location. Note however that you could add Body.1 to Body.2 one just by selecting Body.2. |
|||||||
|
|
|||||||
| 3. | Click OK.
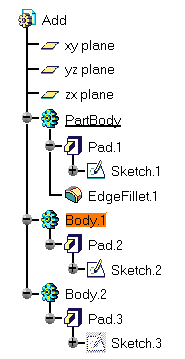
The specification tree and Part Body now looks like this: |
||||||
|
|||||||
You will note that:
|
|||||||
|
|||||||
|
|||||||
Structuring Your Design |
|||||||
|
Generally speaking, using Boolean Operations is a good way of structuring your part. Prior to designing, you can actually define the part's structure by associating a body containing geometry with empty bodies. Once these specifications are done, you can then concentrate on the geometry. |
|||||||
|
|
|||||||